House Build - Foundation Part 3 (retaining walls)
House Build - Getting out of the ground
This is my story of the trials and tribulations of building a new home from start to finish, acting as a general contractor and doing as much work as possible to minimize costs while still creating a well built house. I have one rule, do it right, nothing "hokie". That means time, money and lots of research.
The next big step is to build out the retaining walls. This project has two slabs that are separated by an 11' retaining wall. That wall is 12" CMU block that reduces to 8" block a few course up. These blocks are hollow and get filled with concrete. They are essentially a form for the center concrete. They have rebar added both vertically and horizontally.
Building the walls


5/28/20
First grout for retaining walls (we're half way through the walls). This is the concrete that goes into the walls.


6/4/20
Second and last grout to finish the walls. With inspection.


6/6/20
Waterproofing begins. For any foundation walls that are going to be also living space walls, waterproofing is needed. Here's the steps: (1) clean, (2) apply waterproof membrane, (3) french drain and dimple board. The last step is needed to break the hydro-static pressure off the wall to prevent leaks.


6/9/20
Drainage installation


Later during back fill, the drain is wrapped with the filter fabric into a "Taco". Clean crushed stone is used the help with directing any water to the drain and away from the foundation.
6/12/20
Back fill & compaction begins

 The back of the main wall with the second course of dimple board above the "taco".
The filter fabric is 12.5' wide so it's about a 4 feet deep "taco".

 Importing a load of dirt
Next step - Slabs
Importing a load of dirt
Next step - Slabs
This is my story of the trials and tribulations of building a new home from start to finish, acting as a general contractor and doing as much work as possible to minimize costs while still creating a well built house. I have one rule, do it right, nothing "hokie". That means time, money and lots of research.
The next big step is to build out the retaining walls. This project has two slabs that are separated by an 11' retaining wall. That wall is 12" CMU block that reduces to 8" block a few course up. These blocks are hollow and get filled with concrete. They are essentially a form for the center concrete. They have rebar added both vertically and horizontally.
Building the walls

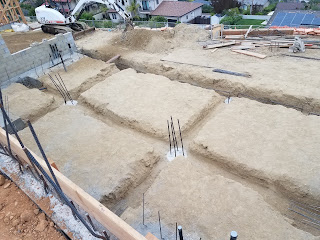
The first few courses of the main retaining wall, built on the grade beams, which are on top of the caissons.

Another view, notice it switches from 12" block to 8" block. That's based on the engineering.

All the blocks on pallets

Wrapping the wall around to the steps, scaffolding going up

Top of the steps where the utilities come in
5/28/20
First grout for retaining walls (we're half way through the walls). This is the concrete that goes into the walls.

Concrete poured and a vibrator put down each cell to settle the concrete
Video

Concrete in the CMU forms. This jog in the walls is a pilaster, which was specified by the Engineer to add additional strength

Conduit access through the wall
Second and last grout to finish the walls. With inspection.

Notice the weeping of water through the wall high, but not at the bottom courses that were previously grouted.

Additional steel sticking out will tie into the final slab.

Another view.
6/6/20
Waterproofing begins. For any foundation walls that are going to be also living space walls, waterproofing is needed. Here's the steps: (1) clean, (2) apply waterproof membrane, (3) french drain and dimple board. The last step is needed to break the hydro-static pressure off the wall to prevent leaks.

Back of main wall - sealed the wall and about 8" into the footing

One of the sides

Close up of the finish - all holes are filled after 3 heavy coats of the sealant
Drainage installation

Side view - you can see the white drain (perforated pipe) inside the filter fabric. What you can't see is dimple board that's behind the fabric. It's extra insurance. The dimple board will break any water pressure against the wall and allow for any water to head to the drain.

Back of main wall - before back fill
Later during back fill, the drain is wrapped with the filter fabric into a "Taco". Clean crushed stone is used the help with directing any water to the drain and away from the foundation.
6/12/20
Back fill & compaction begins

The "taco" is closed. other pipes (top of picture) are installed (downspouts, electrical conduit) while things are easy to access.

The filter fabric is 12.5' wide so it's about a 4 feet deep "taco".

Backfilling and compacting


Comments
Post a Comment