House Build - Foundation Part 2 (grade beams)
House Build - Getting out of the ground
This is my story of the trials and tribulations of building a new home from start to finish, acting as a general contractor and doing as much work as possible to minimize costs while still creating a well built house. I have one rule, do it right, nothing "hokie". That means time, money and lots of research.
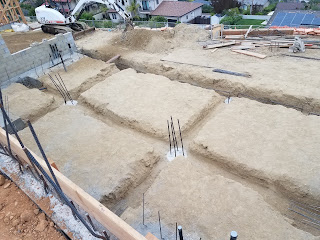
The next big step is to get the footing or grade beams installed. A grade beam is a concrete beam poured in the dirt that supports the house between the caissons. They look like footings but are on top of the caissons so they are called grade beams as they span between each caisson.
4/15/20
Finally starting the grade beams
Initial trenching for the steps that tie the lower foundation to the upper foundation
Intial grade beam trenching
Steel delivery for grade beams
Steps forming. Also notice the caisson bars are bent over to fit into the grade beams
Top view of steps
Grade beams with some of the rebar installed
Rebar hell, steel needed for grade beams but to also tie into the future walls and slab
Another view
Top of the step, conduit for electric prepared
Keystone retaining wall
During this time I have started work on a keystone retaining wall. That is a loose block (no mortor) wall that will create a terrace to build a back yard
First few courses of a retaining wall to form up the backyard. This work was all me. Each block was 55lbs. Total wall is over 16.5 pallets (700 blocks). Beyond the blocks, crushed gravel is added to each stone to lock things together and add a path for drainage.
A view from the top looking at the lower wall. This and the second wall need to cover an elevation change of about 10'. The new walls almost cover that.
I built a slide to shuttle both blocks and crushed rock down to where I needed. Logistics were the main problem with this wall. The lower wall was too far for any mechanized tool that we had on site to reach
Geogrid and wacker (to tamp down the soil). Every few courses geogrid is added to help hold the wall in place.
Soil going in behind the wall
Adding moisture to the soil to help with compaction
6/3/2020
Keystone wall 99% complete
Two 4' walls, 4' apart, a 1:1 slope
Picture of both walls nearing complete
4/30/20
Trench for lower slab plumbing
Main Trench with 3" ABS
5/1/20
Plumbing fittings are installed below the lower slab
A main trench was dug for the lower pad
Trap arm for a future toilet
Trap arm for a shower. I'm going with a curb-less shower (no step in) so these are set down a few inches.
Before concrete is poured, each pipe is wrapped where concrete is poured with foam to prevent expansion issues later
5/4/20
Plumbing signed off by the city
5/11/20
Grade beams signed off by the city and concrete poured (5 trucks)
A pump truck was used to fill in each grade beam
It doesn't look pretty but it's level and has the steel where it's needed for the future steps
Concrete in the steps
Next steps
Build the retaining walls, waterproof, backfill and pour the slabs.


Endeavor to persevere...looking good Dan! Appreciate the updates and look forward to seeing your project progress.
ReplyDelete